The Zerofox Syndicate
SFTP Only Users
2021-04-05This was done on CentOS 8 altough it should work on other distros as well.
Create the user
Start with creating a user and providing them with a password. This will be an SFTP-only user so we can disable the shell.
[root@dataserver ~]# useradd --shell /sbin/nologin mark
[root@dataserver ~]# passwd mark
Changing password for user mark.
New password:
Retype new password:
passwd: all authentication tokens updated successfully.
Note: on CentOS 8 adduser is an alias for useradd. On Ubuntu there
is a difference between the two. You most likely want to use adduser.
Read the fine man pages for details.
Edit /etc/ssh/sshd_config
Disable the sftp-server subsystem by commenting it out.
#Subsystem sftp /usr/libexec/openssh/sftp-server
There are two SFTP subsystems built into SSH. The older one, sftp-server,
spins up a separate process and requires more work to get the ChrootDirectory
directive working. Ever lazy I suggest using the newer internal-sftp subsystem.
Subsystem sftp internal-sftp
Underneath add the following to chroot the user mark to their home directory and allow them to only use SFTP throug the SSH daemon.
Match User mark
    ChrootDirectory %h
    X11Forwarding no
    AllowTcpForwarding no
    ForceCommand internal-sftp
Note we are matching on User mark. If you have multiple users the better way is to create a group sftp-only and match it with Group sftp-only. We’ll get back to that.
Now we can restart or reload SSH to make sure that our configuration is taken into account.
systemctl restart sshd
Fix the permissions
The above is insufficient. We’ll also need to make root the owner of the home directory.
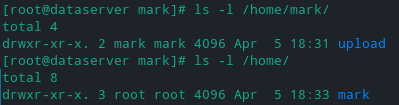
chown root:root /home/mark
chmod 755 /home/mark
Right now it is not possible for mark to upload files however because he cannot upload directly into the chrooted-location. To fix this we create an upload directory.
mkdir /home/mark/upload
chown mark:mark /home/mark/upload
I also like to clean up the bash dot-files that are created by default.
rm /home/mark/.bash*
If you are done this is what the permissions should look like respectively.
Example usage
Attempting to sign-in over SSH should result in the message. This account is currently not available.
To test the upload I create a file and upload it.
[root@dataserver ~]# echo hello > file.txt
[root@dataserver ~]# sftp mark@localhost
mark@localhost's password:
Connected to mark@localhost.
sftp> cd upload
sftp> put file.txt
Uploading file.txt to /home/mark/upload/file.txt
Alternatively you can pipe your SSH commands from a file or something else.
[root@dataserver ~]# echo -e "ls upload\nget upload/file.txt" | sftp mark@localhost
mark@localhost's password:
Connected to mark@localhost.
sftp> ls upload
upload/file.txt
sftp> get upload/file.txt
Fetching /home/mark/upload/file.txt to file.txt
/home/mark/upload/file.txt
SFTP Options
A very useful option is -C to enable compression. This can save you some bandwith.
The sftp command doesn’t play nice with the user@ notation when connecting
directly to an IPv6 adres.
Instead of sftp mark@[::1] you will have to use sftp -o user=mark [::1]
to specify the user.